Archive

Archive for the ‘Linux’ Category

Linux container LXC on Amazon EC2 server (Cloud inside Cloud)

July 24th, 2010

Amazon AWS announced supporting pvgrub kernel a week ago. So it is possible to run your own kernel with new features like btrfs, cgroup, namespace, high resolution timers. Just be aware the AWS still use a very ancient xen version, so you will need to patch stock kernel to be bootable.

Here is a step by step guide on how to setup a linux container on top of EC2. Since EC2 itself is virtual environment, it is almost impossible to run other vm technology on top of it. You can read these general guide [1] [2] on how to setup a linux container.

Step 1: Host VM

In order to run lxc, the host will need to support cgroup and namespace. Ubuntu 10.4 lucid or newer includes them. I also made two public archlinux AMIs which support all these features, you can find them here.

Mount up /cgroup,

mkdir /cgroup
mount -t cgroup none /cgroup

In order for network to work you will need these two packages: iptables and bridge-utils. Ubuntu has lxc package, but on archlinux you will need to build it from aur.

Bring up the virtual network interface, you only need one here for all your lxc.

brctl addbr br0
ifconfig br0 192.168.3.1 up

Of course, you can pick other network address. You should skip the step mentioned in other guide to add your physical network such as “brctl addif br0 eth0″, because amazon will not route your private packet.

Step 2: Filesystem

Lxc installation should already include templates for some popular linux distribution. You can read the guide I mentioned above. For archlinux you can use my chroot script and patch.

I am not sure how to manually setup network for other distribution. You can also setup a dhcpd on host for the container.

On archlinux you can disable the eth0 setup but enable the default route like this in rc.conf,

INTERFACES=()
gateway="default gw 192.168.3.1"
ROUTES=(gateway)

Here I assume your new root filesystem inside /mnt/mini. You LXC config file should look like this

lxc.utsname = mini
lxc.network.type = veth
lxc.network.flags = up
lxc.network.link = br0
lxc.network.name = eth0
lxc.network.ipv4 = 192.168.3.20/24
lxc.mount.entry = none /mnt/mini/dev/pts devpts newinstance 0 0
lxc.mount.entry = none /mnt/mini/proc    proc   defaults 0 0
lxc.mount.entry = none /mnt/mini/sys     sysfs  defaults 0 0
lxc.mount.entry = none /mnt/mini/dev/shm tmpfs  defaults 0 0
lxc.rootfs = /mnt/mini
lxc.tty = 3
lxc.pts = 1024

Step 3: Container network

For network inside container to work, you still need to do two more things.

cp /etc/resolve.conf /mnt/mini/etc
iptables -t nat -A POSTROUTING -o eth0 -j MASQUERADE
sysctl -w net.ipv4.ip_forward=1

Now you can start your container.

lxc-create -f /mnt/config -n mini
lxc-start -n mini

If there is no error during container boot, you can proceed to enter your container.

lxc-console -n mini

Login as root with no password.

ping www.google.com

If you are lucky, you should see ping go through. It may take a second to discover the new route inside container.

Step 3: Run service inside container

The main reason for most people to setup a container inside an EC2 is probably for jailing network daemons. But your container only have non reachable private address, so do it home router style using port forwarding with iptables.
For example, start your httpd daemon inside container as usual, then run this on host

iptables -t nat -A PREROUTING -i eth0 -p tcp \
   --dport 80 -j DNAT --to-destination 192.168.3.20

Now you should be able to reach your container from public ip.
Bookmark and Share  
 

Yejun Linux , , , , , ,

Using Ziproxy to block ads and save bandwidth

June 19th, 2010

Recently AT&T ended unlimited wireless data plan for iphone and ipad and starbucks will offer free wifi. If you are an iphone or ipad user, you might be wondering how to save bandwidth and secure wifi access. If you also own a Linux server with fast internet access, here is how.

Table of Content

  1. Ziproxy
  2. Ad Block
  3. PPTP VPN
  4. Client Configure

1. Ziproxy

Ziproxy is free opensource non-cache proxy to reduce webpage size by recompress image files.
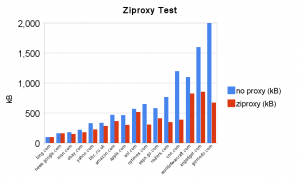
I run a simple test on some of my favorite websites by measuring full page loading size. These data are measured by Firefox, so the flash is included. Images have visible compression artifact at normal viewing distance, but that’s the price you have to pay for saving bandwidth. Ads are stripped away in proxy testing, see next section.


Ziproxy Test

Install ziproxy or from package manager.
Modify /etc/ziproxy/ziproxy.conf

Port = 3128
RunAsUser = "nobody"
RunAsGroup = "nobody"
PreemptNameRes = true
ImageQuality = {65,65,65,65}
URLReplaceDataCT = "/etc/ziproxy/replace_ct.list"
URLReplaceDataCTList = {"image/jpeg", "image/gif", "image/png", "application/x-shockwave-flash"}

Don’t use VPN end point address here, because it doesn’t exist before VPN established. Depends on how you setup VPN, you can either limit access from iptables or binding address. You can also start ziproxy from ppp if-up script to avoid binding address problem.
65% compression has a good balance between quality and size. URLReplaceDataCT will be used for adblocking to further reduce bandwidth usage.

Update: I did some real test on iPad. I used the traffic number on VPN interface to measure the total bandwidth usage to visit all above website once. I also measured multiple times to make sure data convergent. Here is the result
No Proxy: TX 13.3MB RX 1.6MB
With Ziproxy: TX 8.2MB RX 1.5MB
Total: 35% Bandwidth save before VPN overhead.

2. Ad Block

There are several ways to block ads.
First, VPN configure of your iPad or iPhone supports proxy autoconfigure. You can use a special proxy.pac file to block ads. It will redirect urls to a fake proxy.

You can also chain privoxy to your ziproxy.

Another way is url block list used by ziproxy
/etc/ziproxy/replace_ct.list

http://*.yimg.com/*/promotions/*
http://*.doubleclick.net/*
http://*.2mdn.net/*
http://*.serving-sys.com/*
http://*.adtechus.com/*
http://*.eyewonder.com/*
http://*.atdmt.com/*
http://*.fbcdn.net/ads*/*
http://*.advertising.com/*
http://*.smartadserver.com/*
http://*.mediaplex.com/*
http://*.zedo.com/*
http://*.tumri.com/*
http://*yieldmanager*
http://*.checkm8.com/*
http://*.pointroll.com/*
http://*.tubemogul.com/*
http://*.intellitxt.com/*
http://*.crispwireless.com/*
http://*.condenet.com/*
http://*.eyereturn.com/*
http://*.linkstorm.net/*
http://*.optmd.com*
http://*.tcgmsrv.net*
http://*.videoegg.com*
http://adserver.*
http://ads.*
http://ad.*
http://*/ads/*
http://*adsfile*
http://*adfile*
http://*ad_file*
http://*ads_file*
http://*banner*
http://*banners*
http://*sponsor*
http://*sponsor*
http://*/adRequest/*
http://*Advertising*
http://*/adx/*
http://*marketing*
http://*adspace*
http://*adimage*
http://*ad_*
http://*AdManager*
http://*adscontent*
http://*adcontent*

These are urls I found in my testing website.

3. PPTP VPN

Poptop is a PPTP server. Most linux should include it in ppp package.
Here is some sample configure, you can use
/etc/pptpd.conf

option /etc/ppp/options.pptpd
localip 192.168.x.1
remoteip 192.168.x.234-238,192.168.x.245

/etc/ppp/options.pptpd

name pptpd
refuse-pap
refuse-chap
refuse-mschap
require-mschap-v2
require-mppe-128

/etc/ppp/chap-secrets

user pptpd password *

If you want to enable “Send All Traffic” option on your iDevice, you also need to enable nat and ipv4 forwarding. This is only needed if you want to use application which does not support normal proxy. I use shorewall for NAT setup.

As I mentioned in previous section, you can enable ad block in VPN setting with proxy.pac file.

4. Client Configure

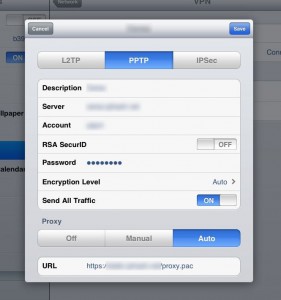
Here is example setting for vpn and proxy.
Client VPN and Proxy Setting

If you don’t need ad block. Here is a simple proxy.pac, or you can use manual proxy setting.

function FindProxyForURL(url, host) {
         if ( url.substring(0, 6) == "https:" ) { return "DIRECT"; }
         return "PROXY 192.168.x.1:3128; DIRECT";
}
Bookmark and Share  
 

Yejun Linux , , , , , , , , , , , ,

Disk IO: EC2 vs Mosso vs Linode

April 7th, 2009

Recently I read an interesting idea on amazon EC2 forum about Raid0 strip on EBS to improve disk access performance. So I am very curious to know whether this idea actually works. Technically it is also possible to setup a raid system on Linode(referral link) as well, but it will be backed by same hardware (so I didn’t test this idea).

In this test I used bonnie++ 1.03e with direct IO support. These 3 VPS have slightly different configure. Mosso server has 256MB ram with 2.6.24 kernel and 4 AMD virtual cores. Lindoe vps has 360MB ram with custom built 2.6.29 kernel and 4 intel virtual cores. EC2 high-cpu medium instance has 1.7GB ram with 2.6.21 kernel and 2 intel virtual cores.

Here is the raw test result. On each VPS I run bonnie++ 3 times, then use median of 3 tests as the final result. The summary result is unweighted average value of different columns. Due to the memory size difference, I used different test file size. The EBS I used here is 4×10GB raid0.

In this table, -D means that test run with Direct IO option. The best results are highlighted. Direct IO test on EBS taking forever, so I didn’t finish that test.

.

Write (MB/s) Read (MB/s) Seek (#/s)

.

Mosso -D 32.4 52.9 219

.

Mosso 56.9 52.6 225

.

Linode -D 37.7 76 187

.

Lindoe 41.5 76.1 201

.

EC2 -D 32.4 50.7 220

.

EC2 18.9 39.2 210

.

EBS Raid0 52.4 23.1 1076

In this chart, I used logarithm scales and shifted origin in order to show the relative difference between them. So the column value does not reflect the real test results. Higher value is better.

Disk IO Chart

Conclusions: There is no clear winner in this test. Each VPS has the their high score in different category. Only one thing is clear, O_Direct does not work very well on EBS. Due to the nature of VPS, the Disk IO test is very unreliable. The performance I show here is not repeatable and may not reflect the true disk performance.

Bookmark and Share  
 

Yejun Linux , , , , , , , , ,

Archlinux EC2 Public AMI

April 5th, 2009

I made 2 public Archlinux EC2 AMI.

Important Notes:

  • Most instructions on this page are outdated. All necessary packages have been included inside latest AMI
  • If you want to build your own AMI, I released this build script on gitub and aur packages.

Update 2011/1/25

Update kernel to 2.6.37 and fix account creation.

Update 2010/8/30

Change static ip to kernel dhcp and remove initrd

Update 2010/8/28

The network configure will be saved when image first time booted. If you want to revert to dhcp in case you need to rebuild or stop. You should run this

sudo /etc/rc.d/ec2 stop

I also changed default cflags, so if you want to recompile packages, you can use srcpac. For example

sudo abs extra/python
sudo srcpac -Sb python

Update 2010/8/21

Add a user arch with the same ssh key as root.

The hostname is now static, if you want to rebundle, make sure change HOSTNAME in rc.conf to myhost and remove last line of /etc/hosts.

Here is the new build script.

Update 2010/7/23:

Updated to BTRFS as root.

Update 2010/7/20:

Updated to pvgrub and EBS.
Here is the updated script to generate an EC2 EBS.
I also made an aur package for kernel26 with patch from gentoo and opensuse.

There is a simple patch for mainline kernel from amazon.

Arch AMI ID
i386 ami-5ae11133
x86_64 ami-84e111ed

Updates:
10/21/2009: Updated all packages and use ubuntu kernels. Here is the new AMI making script. Those kernels will load some unnecessary modules, you will need to unload them manually. I will update again if I can found more stable kernel.

They are very basic installation with just ssh. If you need tools like ec2-ami-tools or ec2-api-tools, you can find my aur packages here. Or you can add my private repo to your pacman.conf.

[iphash]
Server = http://static.iphash.net/public/i686/

or

[iphash]
Server = http://static.iphash.net/public/x86_64/

Then

pacman -Sy ec2-ami-tools ec2-api-tools

If you want to roll your own image. Here (outdated - see beginning of this post) is the script I used to make these AMIs.

If you wish to set hostname and domainname you can pass following script as instance user-data.

MYHOST=yourhost    #set your real hostname here
MYDOMAIN=yourdomain  #set your domainname here
 
sed -i s/myhost/$MYHOST/ /etc/rc.conf
hostname $MYHOST
 
echo "NISDOMAINNAME=\"$MYDOMAIN\"" >/etc/conf.d/nisdomainname
nisdomainname $MYDOMAIN
 
/etc/rc.d/syslog-ng restart
 
x=$(curl -s http://169.254.169.254/latest/meta-data/local-ipv4)
if [ $(echo $x|grep 404|wc -l) -eq 0 ]; then
cat <<EOF>/etc/hosts
#<ip-address>   <hostname.domain.org>   <hostname>
127.0.0.1               localhost.localdomain   localhost
$x  $MYHOST.$MYDOMAIN  $MYHOST
# End of file
EOF
fi
cp /etc/skel/.bash* /root/
Bookmark and Share  
 

Yejun Linux , , , ,

IPv6 Sage

April 1st, 2009

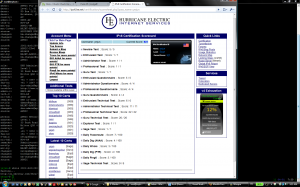
Just by doing some simple tasks like dig AAAA record or traceroute6. I am on he.net’s TOP 10 IPv6 certs now.

IPv6 Sage

Updates: This daily dig actually remind me those boring daily quests in WOW.

Bookmark and Share  
 

Yejun Linux ,

Deploy Archlinux Chroot onto VPS

March 31st, 2009

Update 7/20/2010: I updated this script to be more Lxc friendly. And I also made small patch to modify inittab rc.sysinit rc.shutdown for lxc. If you are not use using dhcpd, you will still need to modify /etc/rc.conf to setup default route.

Download the new script here, and Lxc patch.


Most VPS providers do not have archlinux image or allow changing root device like Linode does. Even though I am comfortable dealing with debian or ubuntu, but tiny difference between them are still annoying over the time. So I decide to install a mini chroot enviroment onto all of them to normalize linux enviroment.

If you want to use a ubuntu or debian chroot, you probably should read DebootstrapChroot. My method here only applys to Archlinux.

These scripts are only for Linux newbies like myself, who are lazy to type all that many commands every time. If you are a Linux guru or sysadmin, you may find this method trivial, insecure or laughable.

Prepare your local system

I assume you already have at least one working Archlinux system installed. First you need to install some necessary tools. If you do not have an archlinux installed, you may skip to last section of post and test the one I built.

pacman -Sy devtools lzma cpio

Devtools includes mkarchroot which is a script bootstrip a mini root similar to debootstrap. If you just run “mkarchroot miniroot base”, it can make you a working mini archlinux. But the default installation is huge about 500MB. You probably do not want all of them inside a VPS enviroment.

Lzma, Cpio are my choice of packaging, you can also use zip, tar, gzip or bzip2, and modify other parts of my script accordingly.

Make a working chroot

The first script is to make a compact mini root and compress it to a single file.
You can either download (outdated) or copy/paste following lines to a file name miniarch

#!/bin/bash
# 2009 Copyright Yejun Yang (yejunx AT gmail DOT com)
# Creative Commons Attribution-Noncommercial-Share Alike 3.0 United States License.
# http://creativecommons.org/licenses/by-nc-sa/3.0/us/
 
PACKS="sed gawk coreutils filesystem texinfo grep pacman \
       module-init-tools wget curl net-tools procps nano tar cpio zip \
       gzip bzip2 lzma psmisc initscripts iputils dnsutils iproute2 \
       less dash which"
 
if [[ $1 == i686 ]]; then
  ARCH=i686
else
  ARCH=x86_64
fi
 
ROOT=mini_$ARCH
 
cat <<EOF > pacman.conf
[options]
HoldPkg     = pacman glibc
SyncFirst   = pacman
 
[core]
Server = ftp://mirror.cs.vt.edu/pub/ArchLinux/\$repo/os/$ARCH
Server = http://archlinux.mirrors.uk2.net/\$repo/os/$ARCH
Include = /etc/pacman.d/mirrorlist
[extra]
Server = ftp://mirror.cs.vt.edu/pub/ArchLinux/\$repo/os/$ARCH
Server = http://archlinux.mirrors.uk2.net/\$repo/os/$ARCH
Include = /etc/pacman.d/mirrorlist
[community]
Server = ftp://mirror.cs.vt.edu/pub/ArchLinux/\$repo/os/$ARCH
Server = http://archlinux.mirrors.uk2.net/\$repo/os/$ARCH
Include = /etc/pacman.d/mirrorlist
EOF
 
mkarchroot -C pacman.conf $ROOT $PACKS
 
chmod 666 $ROOT/dev/null
mknod -m 666 $ROOT/dev/random c 1 8
mknod -m 666 $ROOT/dev/urandom c 1 9
mknod -m 600 $ROOT/dev/console c 5 1
mkdir -m 755 $ROOT/dev/pts
mkdir -m 1777 $ROOT/dev/shm
 
echo nameserver 4.2.2.1 > $ROOT/etc/resolv.conf
echo nameserver 4.2.2.2 >> $ROOT/etc/resolv.conf
 
find $ROOT -depth -print | cpio -ov | lzma -5 > $ROOT.cpio.lzma

Modify PACKS= to packages you want to be installed.

You should also modify the Server= to whichever fast for you. I used rankmirrors to find out the fastest server.

Run this script

./miniarch

or

./miniarch i686

or both.
It will make a minimal working chroot for Archlinux under currect directory and pack them into a single file mini_x86_64.cpio.lzma or mini_i686.cpio.lzma. These two file should be around 40MB if everything worked correctly.

Copy these .lzma file to your webserver root. Now you can safely delete the working directory

Deploy to VPS

You can download the files you just made to your vps and unpack them. But I made simple script to do that.

You can download or copy/paste following line to a file name deploy

#!/bin/bash
# 2009 Copyright Yejun Yang (yejunx AT gmail DOT com)
# Creative Commons Attribution-Noncommercial-Share Alike 3.0 United States License.
# http://creativecommons.org/licenses/by-nc-sa/3.0/us/
 
ARCH=$(uname -m)
 
if [[ $ARCH != x86_64 ]]; then
ARCH=i686
fi
 
URL=http://YOURWEBSERVER/
 
if [ -e /var/chroot/mini_${ARCH} ]; then
  echo "**** /var/chroot/mini_${ARCH} already exists. "
  echo "**** You have to remove previous deployment."
  exit 1
fi
 
mkdir -p /var/chroot
cd /var/chroot
echo "Start downloading ${URL}mini_${ARCH}.cpio.lzma , be patient ..."
wget -q -O - ${URL}mini_${ARCH}.cpio.lzma | lzma -d | cpio -idv
 
deploy_success () {
cat <<EOF
# Please add following lines to /etc/fstab
# Mount for chroot
 
proc            /var/chroot/mini_${ARCH}/proc           proc    defaults        0       0
/dev            /var/chroot/mini_${ARCH}/dev            none    rw,bind         0       0
/dev/pts        /var/chroot/mini_${ARCH}/dev/pts        none    rw,bind         0       0
tmpfs           /var/chroot/mini_${ARCH}/dev/shm        tmpfs   defaults        0       0
/lib/modules    /var/chroot/mini_${ARCH}/lib/modules    none    ro,bind         0       0
/tmp            /var/chroot/mini_${ARCH}/tmp            none    rw,bind         0       0
 
# Mini chroot has been deployed to /var/chroot/mini_${ARCH} , please try
#     sudo cp /etc/resolv.conf /var/chroot/mini_${ARCH}/etc/resolv.conf
#     sudo mount -a
#     sudo chroot /var/chroot/mini_${ARCH}
 
 
EOF
}
 
deploy_fail () {
echo "**** Mini chroot deployment failed"
echo -n "**** Clean up /var/chroot/mini_${ARCH} ...."
rm -rf /var/chroot/mini_${ARCH}
echo "done"
}
 
 
if [[ -f /var/chroot/mini_${ARCH}/.arch-chroot ]]; then
  deploy_success
else
  deploy_fail
fi

Change URL= to your own webserver.

Before you running this script on your target machine. Make sure lzma, wget and cpio are installed. If you are using ubuntu, you can run

sudo aptitude update
sudo aptitude install lzma wget cpio

Running this script will deploy a mini chrootable archlinux in to /var/chroot/mini_i686 or /var/chroot/mini_x86_64. The unpacked size will be around 200MB.

To simplify this process, you can copy this file to webserver as well.

wget -q -O - http://yourwebsite/deploy |sudo bash

done.

For lazy people or testing only

If you are so lazy to make your own archlinux mini root or you don’t have a working archlinux, you may test my prebuilt mini root by running following line, you will still need lzma, cpio and wget on your target machine.

wget -q -O - http://bit.ly/iZzq |sudo bash

Disclaimer

I DO NOT guarantee the correctness of these script and my prebuilt chroot. Be caution running any command with sudo. You may not hold me responsible for anything happened to your system.

Updates:
April 5, 2009: changed /bin/sh to /bin/bash

Bookmark and Share  
 

Yejun Linux , , , , ,