Archive

Posts Tagged ‘aws’

Linux container LXC on Amazon EC2 server (Cloud inside Cloud)

July 24th, 2010

Amazon AWS announced supporting pvgrub kernel a week ago. So it is possible to run your own kernel with new features like btrfs, cgroup, namespace, high resolution timers. Just be aware the AWS still use a very ancient xen version, so you will need to patch stock kernel to be bootable.

Here is a step by step guide on how to setup a linux container on top of EC2. Since EC2 itself is virtual environment, it is almost impossible to run other vm technology on top of it. You can read these general guide [1] [2] on how to setup a linux container.

Step 1: Host VM

In order to run lxc, the host will need to support cgroup and namespace. Ubuntu 10.4 lucid or newer includes them. I also made two public archlinux AMIs which support all these features, you can find them here.

Mount up /cgroup,

mkdir /cgroup
mount -t cgroup none /cgroup

In order for network to work you will need these two packages: iptables and bridge-utils. Ubuntu has lxc package, but on archlinux you will need to build it from aur.

Bring up the virtual network interface, you only need one here for all your lxc.

brctl addbr br0
ifconfig br0 192.168.3.1 up

Of course, you can pick other network address. You should skip the step mentioned in other guide to add your physical network such as “brctl addif br0 eth0″, because amazon will not route your private packet.

Step 2: Filesystem

Lxc installation should already include templates for some popular linux distribution. You can read the guide I mentioned above. For archlinux you can use my chroot script and patch.

I am not sure how to manually setup network for other distribution. You can also setup a dhcpd on host for the container.

On archlinux you can disable the eth0 setup but enable the default route like this in rc.conf,

INTERFACES=()
gateway="default gw 192.168.3.1"
ROUTES=(gateway)

Here I assume your new root filesystem inside /mnt/mini. You LXC config file should look like this

lxc.utsname = mini
lxc.network.type = veth
lxc.network.flags = up
lxc.network.link = br0
lxc.network.name = eth0
lxc.network.ipv4 = 192.168.3.20/24
lxc.mount.entry = none /mnt/mini/dev/pts devpts newinstance 0 0
lxc.mount.entry = none /mnt/mini/proc    proc   defaults 0 0
lxc.mount.entry = none /mnt/mini/sys     sysfs  defaults 0 0
lxc.mount.entry = none /mnt/mini/dev/shm tmpfs  defaults 0 0
lxc.rootfs = /mnt/mini
lxc.tty = 3
lxc.pts = 1024

Step 3: Container network

For network inside container to work, you still need to do two more things.

cp /etc/resolve.conf /mnt/mini/etc
iptables -t nat -A POSTROUTING -o eth0 -j MASQUERADE
sysctl -w net.ipv4.ip_forward=1

Now you can start your container.

lxc-create -f /mnt/config -n mini
lxc-start -n mini

If there is no error during container boot, you can proceed to enter your container.

lxc-console -n mini

Login as root with no password.

ping www.google.com

If you are lucky, you should see ping go through. It may take a second to discover the new route inside container.

Step 3: Run service inside container

The main reason for most people to setup a container inside an EC2 is probably for jailing network daemons. But your container only have non reachable private address, so do it home router style using port forwarding with iptables.
For example, start your httpd daemon inside container as usual, then run this on host

iptables -t nat -A PREROUTING -i eth0 -p tcp \
   --dport 80 -j DNAT --to-destination 192.168.3.20

Now you should be able to reach your container from public ip.
Bookmark and Share  
 

Yejun Linux , , , , , ,

Disk IO: EC2 vs Mosso vs Linode

April 7th, 2009

Recently I read an interesting idea on amazon EC2 forum about Raid0 strip on EBS to improve disk access performance. So I am very curious to know whether this idea actually works. Technically it is also possible to setup a raid system on Linode(referral link) as well, but it will be backed by same hardware (so I didn’t test this idea).

In this test I used bonnie++ 1.03e with direct IO support. These 3 VPS have slightly different configure. Mosso server has 256MB ram with 2.6.24 kernel and 4 AMD virtual cores. Lindoe vps has 360MB ram with custom built 2.6.29 kernel and 4 intel virtual cores. EC2 high-cpu medium instance has 1.7GB ram with 2.6.21 kernel and 2 intel virtual cores.

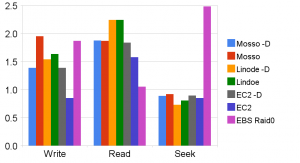
Here is the raw test result. On each VPS I run bonnie++ 3 times, then use median of 3 tests as the final result. The summary result is unweighted average value of different columns. Due to the memory size difference, I used different test file size. The EBS I used here is 4×10GB raid0.

In this table, -D means that test run with Direct IO option. The best results are highlighted. Direct IO test on EBS taking forever, so I didn’t finish that test.

.

Write (MB/s) Read (MB/s) Seek (#/s)

.

Mosso -D 32.4 52.9 219

.

Mosso 56.9 52.6 225

.

Linode -D 37.7 76 187

.

Lindoe 41.5 76.1 201

.

EC2 -D 32.4 50.7 220

.

EC2 18.9 39.2 210

.

EBS Raid0 52.4 23.1 1076

In this chart, I used logarithm scales and shifted origin in order to show the relative difference between them. So the column value does not reflect the real test results. Higher value is better.

Disk IO Chart

Conclusions: There is no clear winner in this test. Each VPS has the their high score in different category. Only one thing is clear, O_Direct does not work very well on EBS. Due to the nature of VPS, the Disk IO test is very unreliable. The performance I show here is not repeatable and may not reflect the true disk performance.

Bookmark and Share  
 

Yejun Linux , , , , , , , , ,

How to copy selected files to cloudfront

February 24th, 2009

If you use my WordPress CDN plugin and amazon cloudfront, you may have problem putting files into s3 storage. Here is a simple way without using any commercial tool if you are using Linux.

First download s3sync . Extract it to somewhere. In this example I used my home directory.

mkdir ~/.s3conf

Edit ~/.s3conf/s3config.yml, which should looks like this

aws_access_key_id: your s3accesskey
aws_secret_access_key: your secret key

Enter wordpress directory

cd wordpress
find * -type f -readable  \( -name \*.css -o -name \*.js -o \
    -name \*.png -o -name \*.jpg -o -name \*.gif -o -name \*.jpeg \) \
    -exec ~/s3sync/s3cmd.rb -v put bucket:prefix/{} {} \
    x-amz-acl:public-read Cache-Control:max-age=604800 \;

Change bucket to your real bucket name. If you don’t need any prefix, do not include slash. Adjust cache-control header. ~/s3sync/s3cmd.rb should point to where you extracted s3sync.

Update 1: Don’t forget install mime-types if you Linux distro didn’t install it by default. Check whether /etc/mime.types exists.

Update 2: s3cmd.rb does not set content-type at all. I think python version does. Any way I wrote a script to redo everything.

#!/bin/sh
 
BUCKET=
#Set your bucket
PREFIX=
#If you want to use prefix set it like PREFIX=blog/
 
find * -type f -readable  -name \*.css -exec ~/s3sync/s3cmd.rb -v put $BUCKET:$PREFIX{} {} \
    x-amz-acl:public-read Cache-Control:max-age=604800 Content-Type:text/css \;
 
find * -type f -readable  -name \*.js -exec ~/s3sync/s3cmd.rb -v put $BUCKET:$PREFIX{} {} \
    x-amz-acl:public-read Cache-Control:max-age=604800 Content-Type:application/x-javascript \;
 
find * -type f -readable  -name \*.png -exec ~/s3sync/s3cmd.rb -v put $BUCKET:$PREFIX{} {} \
    x-amz-acl:public-read Cache-Control:max-age=604800 Content-Type:image/png \;
 
find * -type f -readable  -name \*.gif -exec ~/s3sync/s3cmd.rb -v put $BUCKET:$PREFIX{} {} \
    x-amz-acl:public-read Cache-Control:max-age=604800 Content-Type:image/gif \;
 
find * -type f -readable  \( -name \*.jpg -o -name \*.jpeg \) -exec ~/s3sync/s3cmd.rb -v put $BUCKET:$PREFIX{} {} \
    x-amz-acl:public-read Cache-Control:max-age=604800 Content-Type:image/jpeg \;

Update 3: I just realized cloudfront does not gzip files. So I rewrote my script to force gzip encoding on css and js files.

#!/bin/sh
 
BUCKET=
#Your bucket
PREFIX=
#If you want to use prefix set it like PREFIX=blog/ 
S3CMD=/home/user/s3sync/s3cmd.rb
#Your absolute path to s3cmd.rb
 
find * -type f -readable  -name \*.css -exec sh -c "gzip -9 -c {} > /tmp/s3tmp && \
        $S3CMD -v put $BUCKET:$PREFIX{} /tmp/s3tmp x-amz-acl:public-read Cache-Control:max-age=604800 Content-Type:text/css Content-Encoding:gzip" \;
 
find * -type f -readable  -name \*.js -exec sh -c "gzip -9 -c {} > /tmp/s3tmp && \
        $S3CMD -v put $BUCKET:$PREFIX{} /tmp/s3tmp x-amz-acl:public-read Cache-Control:max-age=604800 Content-Type:application/x-javascript Content-Encoding:gzip" \;
 
find * -type f -readable  -name \*.png -exec $S3CMD -v put $BUCKET:$PREFIX{} {} \
    x-amz-acl:public-read Cache-Control:max-age=604800 Content-Type:image/png \;
 
find * -type f -readable  -name \*.gif -exec $S3CMD -v put $BUCKET:$PREFIX{} {} \
    x-amz-acl:public-read Cache-Control:max-age=604800 Content-Type:image/gif \;
 
find * -type f -readable  \( -name \*.jpg -o -name \*.jpeg \) -exec $S3CMD -v put $BUCKET:$PREFIX{} {} \
    x-amz-acl:public-read Cache-Control:max-age=604800 Content-Type:image/jpeg \;

Update 4: 4/1/2009
I added function to copy a single file or single directory.

#!/bin/sh
if [[  -n $1 ]]; then
LOC=$1
else
LOC="*"
fi
 
BUCKET=
#Your bucket
PREFIX=
#If you want to use prefix set it like PREFIX=blog/ 
S3CMD=/home/user/s3sync/s3cmd.rb
#Your absolute path to s3cmd.rb
 
find $LOC -type f -readable  -name \*.css -exec sh -c "gzip -9 -c {} > /tmp/s3tmp && \
        $S3CMD -v put $BUCKET:$PREFIX{} /tmp/s3tmp x-amz-acl:public-read Cache-Control:max-age=604800 Content-Type:text/css Content-Encoding:gzip" \;
 
find $LOC -type f -readable  -name \*.js -exec sh -c "gzip -9 -c {} > /tmp/s3tmp && \
        $S3CMD -v put $BUCKET:$PREFIX{} /tmp/s3tmp x-amz-acl:public-read Cache-Control:max-age=604800 Content-Type:application/x-javascript Content-Encoding:gzip" \;
 
find $LOC -type f -readable  -name \*.png -exec ${S3CMD} -v put $BUCKET:$PREFIX{} {} \
    x-amz-acl:public-read Cache-Control:max-age=604800 Content-Type:image/png \;
 
find $LOC -type f -readable  -name \*.gif -exec ${S3CMD} -v put $BUCKET:$PREFIX{} {} \
    x-amz-acl:public-read Cache-Control:max-age=604800 Content-Type:image/gif \;
 
find $LOC -type f -readable  \( -name \*.jpg -o -name \*.jpeg \) -exec ${S3CMD} -v put $BUCKET:$PREFIX{} {} \
    x-amz-acl:public-read Cache-Control:max-age=604800 Content-Type:image/jpeg \;

For example if you saved this script to a file name cloudfront:

cd wordpress
cloudfront wp-content/uploads

Without any command line argument this script will upload all file under current directory.

Bookmark and Share  
 

Yejun Linux, Web , , , , ,