Boot grub2 stage2 directly from windows bootmgr with grub4dos stage1

August 24th, 2010

There is problem which has been puzzled me for long time. When the grub2 root is on 2nd disk, the stage2 is not directly bootable from grub4dos stage1, but can be chain loaded from grub4dos as a linux kernel. The same problem happens to burg as well.

It turns out the stage2 file only has the relative path from root if you use grub-install script. So all you have to do is to embed a absolute path in prefix. Here is the brief step to make a direct bootable stage2.

grub-mkimage --output=/boot/grub/core.img --prefix=(hd1,2)/boot/grub \
         biosdisk part_msdos ext2
cat /boot/grub/lnxboot.img /boot/grub/core.img > g2ldr

Now copy g2ldr to your windows’ partition. Make a grub4dos stage1 file

grubinst.exe -o -b=g2ldr g2ldr.mbr

You can find grubinst.exe from grub4dos website.

Add it to windows bootmgr with bcdedit

bcdedit /create /d Linux /application BOOTSECTOR
bcdedit /set {ID} device partition=c:
bcdedit /set {ID}  path \g2ldr.mbr
bcdedit /displayorder {ID} /addlast
Bookmark and Share  
 

Yejun Uncategorized

Linux container LXC on Amazon EC2 server (Cloud inside Cloud)

July 24th, 2010

Amazon AWS announced supporting pvgrub kernel a week ago. So it is possible to run your own kernel with new features like btrfs, cgroup, namespace, high resolution timers. Just be aware the AWS still use a very ancient xen version, so you will need to patch stock kernel to be bootable.

Here is a step by step guide on how to setup a linux container on top of EC2. Since EC2 itself is virtual environment, it is almost impossible to run other vm technology on top of it. You can read these general guide [1] [2] on how to setup a linux container.

Step 1: Host VM

In order to run lxc, the host will need to support cgroup and namespace. Ubuntu 10.4 lucid or newer includes them. I also made two public archlinux AMIs which support all these features, you can find them here.

Mount up /cgroup,

mkdir /cgroup
mount -t cgroup none /cgroup

In order for network to work you will need these two packages: iptables and bridge-utils. Ubuntu has lxc package, but on archlinux you will need to build it from aur.

Bring up the virtual network interface, you only need one here for all your lxc.

brctl addbr br0
ifconfig br0 192.168.3.1 up

Of course, you can pick other network address. You should skip the step mentioned in other guide to add your physical network such as “brctl addif br0 eth0″, because amazon will not route your private packet.

Step 2: Filesystem

Lxc installation should already include templates for some popular linux distribution. You can read the guide I mentioned above. For archlinux you can use my chroot script and patch.

I am not sure how to manually setup network for other distribution. You can also setup a dhcpd on host for the container.

On archlinux you can disable the eth0 setup but enable the default route like this in rc.conf,

INTERFACES=()
gateway="default gw 192.168.3.1"
ROUTES=(gateway)

Here I assume your new root filesystem inside /mnt/mini. You LXC config file should look like this

lxc.utsname = mini
lxc.network.type = veth
lxc.network.flags = up
lxc.network.link = br0
lxc.network.name = eth0
lxc.network.ipv4 = 192.168.3.20/24
lxc.mount.entry = none /mnt/mini/dev/pts devpts newinstance 0 0
lxc.mount.entry = none /mnt/mini/proc    proc   defaults 0 0
lxc.mount.entry = none /mnt/mini/sys     sysfs  defaults 0 0
lxc.mount.entry = none /mnt/mini/dev/shm tmpfs  defaults 0 0
lxc.rootfs = /mnt/mini
lxc.tty = 3
lxc.pts = 1024

Step 3: Container network

For network inside container to work, you still need to do two more things.

cp /etc/resolve.conf /mnt/mini/etc
iptables -t nat -A POSTROUTING -o eth0 -j MASQUERADE
sysctl -w net.ipv4.ip_forward=1

Now you can start your container.

lxc-create -f /mnt/config -n mini
lxc-start -n mini

If there is no error during container boot, you can proceed to enter your container.

lxc-console -n mini

Login as root with no password.

ping www.google.com

If you are lucky, you should see ping go through. It may take a second to discover the new route inside container.

Step 3: Run service inside container

The main reason for most people to setup a container inside an EC2 is probably for jailing network daemons. But your container only have non reachable private address, so do it home router style using port forwarding with iptables.
For example, start your httpd daemon inside container as usual, then run this on host

iptables -t nat -A PREROUTING -i eth0 -p tcp \
   --dport 80 -j DNAT --to-destination 192.168.3.20

Now you should be able to reach your container from public ip.

Bookmark and Share  
 

Yejun Linux , , , , , ,

Linux file copy benchmark cp vs cpio vs tar vs rsync

July 19th, 2010

There are many commands to copy a directory in Linux. The difference between them in current Linux distribution are very small. All of them support link, time, ownership and sparse.

I tested them to copy a Linux kernel source tree. Each command I tested twice and keep the lower result.
The original directory size is 639660032 bytes. All methods generate exact same size of 675446784 bytes without sparse option.

Non Sparse Sparse
rsync rsync -a src /tmp rsync -a -S src /tmp
cpio find src -depth|cpio -pdm /tmp find src -depth|cpio -pdm –sparse /tmp
cp cp -a –sparse=never src /tmp cp -a –sparse=always src /tmp
tar tar -c src|tar -x -C /tmp tar -c -S src|tar -x -C /tmp

Time used and destination size:

Concolusion:
For non sparse copy, rsync is the fastest. For sparse copy, rsync and cpio have the best space efficiency, but slow.

Bookmark and Share  
 

Yejun Uncategorized

Using Ziproxy to block ads and save bandwidth

June 19th, 2010

Recently AT&T ended unlimited wireless data plan for iphone and ipad and starbucks will offer free wifi. If you are an iphone or ipad user, you might be wondering how to save bandwidth and secure wifi access. If you also own a Linux server with fast internet access, here is how.

Table of Content

  1. Ziproxy
  2. Ad Block
  3. PPTP VPN
  4. Client Configure

1. Ziproxy

Ziproxy is free opensource non-cache proxy to reduce webpage size by recompress image files.
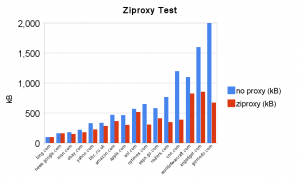
I run a simple test on some of my favorite websites by measuring full page loading size. These data are measured by Firefox, so the flash is included. Images have visible compression artifact at normal viewing distance, but that’s the price you have to pay for saving bandwidth. Ads are stripped away in proxy testing, see next section.


Ziproxy Test

Install ziproxy or from package manager.
Modify /etc/ziproxy/ziproxy.conf

Port = 3128
RunAsUser = "nobody"
RunAsGroup = "nobody"
PreemptNameRes = true
ImageQuality = {65,65,65,65}
URLReplaceDataCT = "/etc/ziproxy/replace_ct.list"
URLReplaceDataCTList = {"image/jpeg", "image/gif", "image/png", "application/x-shockwave-flash"}

Don’t use VPN end point address here, because it doesn’t exist before VPN established. Depends on how you setup VPN, you can either limit access from iptables or binding address. You can also start ziproxy from ppp if-up script to avoid binding address problem.
65% compression has a good balance between quality and size. URLReplaceDataCT will be used for adblocking to further reduce bandwidth usage.

Update: I did some real test on iPad. I used the traffic number on VPN interface to measure the total bandwidth usage to visit all above website once. I also measured multiple times to make sure data convergent. Here is the result
No Proxy: TX 13.3MB RX 1.6MB
With Ziproxy: TX 8.2MB RX 1.5MB
Total: 35% Bandwidth save before VPN overhead.

2. Ad Block

There are several ways to block ads.
First, VPN configure of your iPad or iPhone supports proxy autoconfigure. You can use a special proxy.pac file to block ads. It will redirect urls to a fake proxy.

You can also chain privoxy to your ziproxy.

Another way is url block list used by ziproxy
/etc/ziproxy/replace_ct.list

http://*.yimg.com/*/promotions/*
http://*.doubleclick.net/*
http://*.2mdn.net/*
http://*.serving-sys.com/*
http://*.adtechus.com/*
http://*.eyewonder.com/*
http://*.atdmt.com/*
http://*.fbcdn.net/ads*/*
http://*.advertising.com/*
http://*.smartadserver.com/*
http://*.mediaplex.com/*
http://*.zedo.com/*
http://*.tumri.com/*
http://*yieldmanager*
http://*.checkm8.com/*
http://*.pointroll.com/*
http://*.tubemogul.com/*
http://*.intellitxt.com/*
http://*.crispwireless.com/*
http://*.condenet.com/*
http://*.eyereturn.com/*
http://*.linkstorm.net/*
http://*.optmd.com*
http://*.tcgmsrv.net*
http://*.videoegg.com*
http://adserver.*
http://ads.*
http://ad.*
http://*/ads/*
http://*adsfile*
http://*adfile*
http://*ad_file*
http://*ads_file*
http://*banner*
http://*banners*
http://*sponsor*
http://*sponsor*
http://*/adRequest/*
http://*Advertising*
http://*/adx/*
http://*marketing*
http://*adspace*
http://*adimage*
http://*ad_*
http://*AdManager*
http://*adscontent*
http://*adcontent*

These are urls I found in my testing website.

3. PPTP VPN

Poptop is a PPTP server. Most linux should include it in ppp package.
Here is some sample configure, you can use
/etc/pptpd.conf

option /etc/ppp/options.pptpd
localip 192.168.x.1
remoteip 192.168.x.234-238,192.168.x.245

/etc/ppp/options.pptpd

name pptpd
refuse-pap
refuse-chap
refuse-mschap
require-mschap-v2
require-mppe-128

/etc/ppp/chap-secrets

user pptpd password *

If you want to enable “Send All Traffic” option on your iDevice, you also need to enable nat and ipv4 forwarding. This is only needed if you want to use application which does not support normal proxy. I use shorewall for NAT setup.

As I mentioned in previous section, you can enable ad block in VPN setting with proxy.pac file.

4. Client Configure

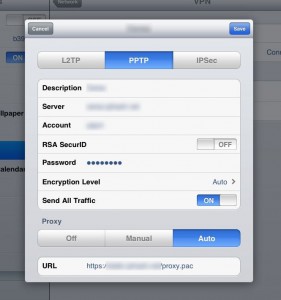
Here is example setting for vpn and proxy.
Client VPN and Proxy Setting

If you don’t need ad block. Here is a simple proxy.pac, or you can use manual proxy setting.

function FindProxyForURL(url, host) {
         if ( url.substring(0, 6) == "https:" ) { return "DIRECT"; }
         return "PROXY 192.168.x.1:3128; DIRECT";
}
Bookmark and Share  
 

Yejun Linux , , , , , , , , , , , ,

Flash video player to html5 fallback

May 15th, 2010

There’re many javascripts [1,2] to do html5 to flash fallback.

I slightly modified this script to do the opposite. It will normally play in a flash player whenever possible, but with html5 video on devices like ipad.

Here is my modified js file. You will also need google loader and open video player.

Add this to your html head

<script src="http://www.google.com/jsapi"></script>
<script src="/static/html5-video.js"></script>

Use html5 video tag as usual.

<video width="592" height="336" preload="none" controls>
  <source src="http://video.mudy.netdna-cdn.com/elephants_dream_592x336.mp4"
  type="video/mp4" />
</video>


[1] http://henriksjokvist.net/archive/2009/2/using-the-html5-video-tag-with-a-flash-fallback
[2] http://diveintohtml5.org/video.html


Bookmark and Share  
 

Yejun Web , , , ,

Use SimpleCDN for Silverlight streaming

October 2nd, 2009

Microsoft’s Smooth Streaming use standard http protocol, so it is possible to use simplecdn mirror bucket for delivering.

Here is my step by step to use open source software and simplecdn for HD video delivering.

Step 1: Server
Even though the Microsoft has opened spec for a while, there is current only 1 open source smooth streaming server code-shop.com.

It has a few server plugins including apache and nginx. I choose nginx as my backend server. You can download the nginx plugin from code-shop.com. It has two parts, a nginx module and a small utiility mp4split which converts mp4 files to fragmented format.

Nginx doesn’t use dynamic linked library, so you have to recompile the entire binary. I compiled the smooth streaming module on nginx-0.7.62 without any problem.

Step 2: Encoding
The entire process is documented on here. It require avisynth and a few other windows utilites.

If you need to do it on linux, here is how:
You will need both ffmpeg and x264. I have tried use ffmpeg alone, but it can not accept stats file from a different bit rate setting which is required step.

Direct pipe through ffmpeg and x264 also doesn’t work, because x264 can’t recognize file type, so you need a named pipe.

mkfifo video.y4m

This file can be reused many times.

Pass 1:

ffmpeg -i big_buck_bunny_720p_h264.mov -an -f yuv4mpegpipe - > video.y4m & \
x264 --threads auto --profile high --level 3.2 --preset slow --no-mbtree --b-pyramid  --min-keyint 24 --keyint 96 --pass 1 --bitrate 2524 -o /tmp/bbb_2524.mp4 video.y4m

You can also run these two commands under 2 different console windows. Setting –no-mbtree is important.

Pass 2:
If everything go ok in pass 1, you can now run pass 2 for multiple bitrate

ffmpeg -i big_buck_bunny_720p_h264.mov -an -s 256x144 -f yuv4mpegpipe - > video.y4m & \
x264 --threads auto --profile high --level 3.2 --preset slow --no-mbtree --b-pyramid  --min-keyint 24 --keyint 96 --pass 2 --bitrate 260 -o /tmp/bbb_260.mp4 video.y4m

Repeat this step with your desired resolution, bitrate and filenames.

The output mp4 file from x264 cannot be streamed, you will need a small utility qt-faststart to fix them.

Problem: I can’t encode playable audio file. If I include audio, the player simply stop.

Now following the rest step described here to split your mp4 files.

Step 3: Player
Unfortunately there’s no working open source player can do smooth stream. Code-shop’s website mentioned openvideoplayer can be updated by replaced with smoothstreaming dll, but I can not find where to put the file.

So I duplicated code-shop’s demo page.

Step 4: SimpleCDN
The simplest step, make a mirror bucket and point it to your webserver.

Result:

Here is my 720p video streaming through simplecdn.
sstreaming

No audio yet. It looks exactly like every other demo page, but it stream through my nginx server and simplecdn. Microsoft’s player use additional query parameters to speedup playback, but simplecdn will strip them away.

Other thought:
I think it is possible to split fragmented mp4 files to real files, so you probably need not a special server module.

Bookmark and Share  
 

Yejun Web , , ,